Showing posts with label buttons. Show all posts

Saturday, February 16, 2013

Our Valentine's Day


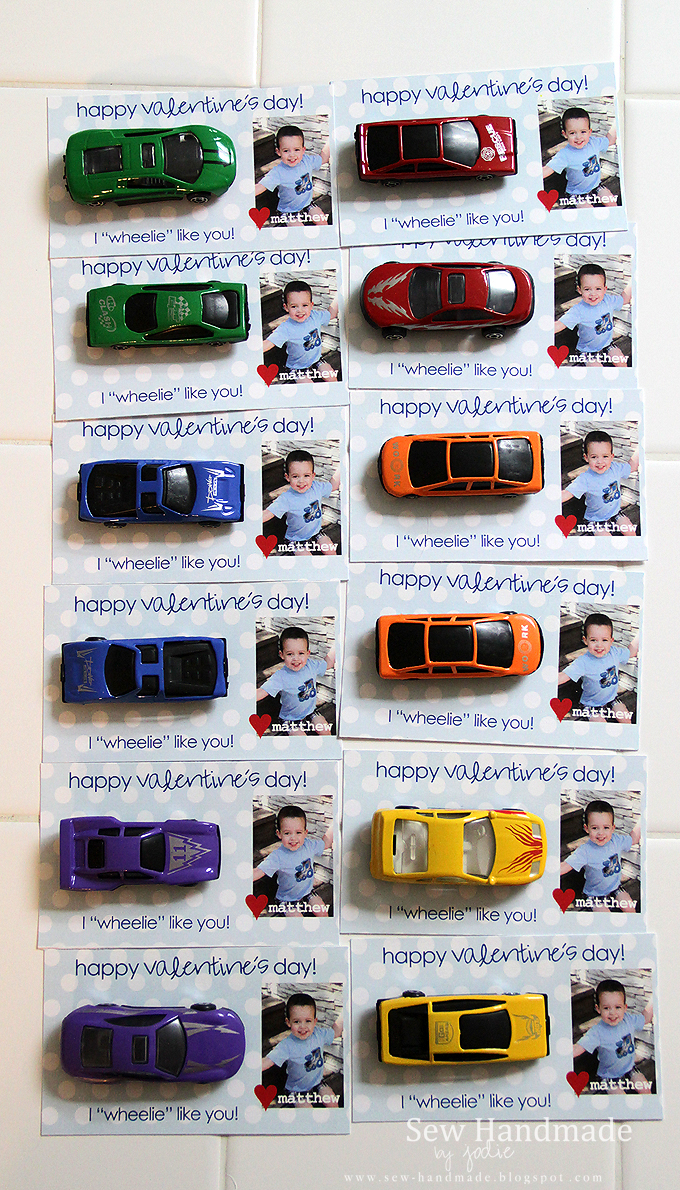
I hope you had a lovely Valentine's Day! It's not one of my "big" holidays, but we definitely celebrate for the kids. Speaking of... aren't they great little Valentines?
My son is in preschool and his class exchanges Valentines. I'm not a big fan of allllll the sugar that surrounds holidays, especially for little kids. I went with an idea I've seen all over the place and did a car-themed Valentine. I think they turned out adorable. 
homemade valentine
 And I loved that we had a rainbow of cars to share. 
homemade valentine

 My  husband and I mainly just exchange cards (although he did come home with a bottle of wine this year!). I made his card. Inside said "Roses are red, but sometimes they're thorny. Being with you makes me so......... corny!" It made us both laugh.
To see previous year's Valentines, visit here for 2012, here and here for 2010, and here for 2008.

Wednesday, January 16, 2013

Button Headband

Inspired by a photo I found on Pinterest (unfortunately it had a broken link, so I won't bother to share it here...), I wanted to make a button headband for my daughter. She's growing out her bangs, so headbands have become a very important accessory! And she loves buttons *almost* as much as her mama. 

This was really quite a simple project - less than 10 minutes. I grabbed my beloved stash of buttons and a standard plastic headband and used hot glue to attach them. I started a about an inch from the end of each side, to allow room for her ears. 

It turned out cute, but a little on the heavy side, so probably not for a full school day. 
Ice on Abalone Shell www.sew-handmade.blogspot.com

In other news, it's been c-o-l-d here. Well, "California cold" anyway. This was the kids' first week back at school and it felt a little mean to drop them off with temperatures below 25°. We bundled up with extra layers, for sure! This was the view out our back doors - frozen dirt and a lovely sunrise. 
Oh... and ice on our abalone shell on the back patio made for quite a lovely photo. 
Would you like to see more of my button projects? Click here. And be sure to check out my Pinterest boards - lots of inspiration and ideas to keep me busy for a loooong time!

Wednesday, November 28, 2012

Button Tree


button craft holiday tree

I think, by now, I've established my love of buttons. I don't use them for a whole lot, really, but I adore them and collect (hoard?) them. Well this Christmas, I used a big chunk of my green buttons to make this little Christmas tree. I think it took a little less than 200 pins and buttons and less than an hour to make. 
button craft holiday tree christmas tree
 I started with a basic (and cheap!) styrofoam tree form from Michaels. Simply stuck a pin through a button and kept going and going and going, using the smaller buttons to fill in between. Easy! The kids actually helped quite a bit, too (with only one minor poke that didn't even draw blood!). It will be on a shelf with this mercury glass owl I found at Home Goods last year. button christmas tree
button craft holiday treeThis is a very easy craft. The only tip I'd suggest is to pay attention to the angle you put the pins in at the top and the bottom so you don't poke all the way through the top of the tree or out the bottom of the tree. 

I think this would also be adorable in all white buttons with colored pins or a variety of colors with white pins. Choices choices choices. 

Tuesday, May 15, 2012

Fun with Spray Paint

I've never spray painted before, but I have a long(ish) list of things I wanted to spray paint. I asked for my husband to teach me how, but he has been super busy. After talking with a friend, I decided to just go for it. What's the worst that could happen?

I started with the jar lids for my rainbow of buttons. They were a bunch of mismatched jam, baby food, and store-bought jars. I hoped a coat (or three!) of white spray paint would unite them. And it did!
 Some of the baby food expiration dates bled through every layer of paint. This is like 5 layers before I gave up! Luckily I had enough blank lids for the colors of the rainbow and these stamped ones can be used for something else. In person, it's actually pretty light and only noticeable up close.

And this cabinet. I bought this at Mervyn's sometime in the 1990's. I think it was about $25. It's cheap wood, but actually pretty sturdy and has lasted well over the years. We've used it for a bunch of different rooms for different purposes. In the new house, I think I'd like to use it as bathroom storage. Since our cabinets are a dark walnut, I wanted a white cabinet in there. And this one was showing some age, so it didn't seem like it would be offended with a fresh coat of paint.

I also have a bunch of other furniture similar to this - wood veneer-type material. I figured this little cabinet would be a good "trial run" to see how the spray paint turned out before committing to larger, more sentimental furniture.

I started by lightly sanding the "wood" to rough it up. Then I went to town. I did very light coats because I wasn't sure how heavy I could go before it would drip. It ended up being 4 light coats, but since it's a small cabinet it went very quickly and dried quickly in between.
Here's the result! 

Because I couldn't find any tape, I didn't bother. Again, this is a cheap-o little cabinet. It actually worked out quite nicely... it's a soft feathered look inside the drawer and cabinet doors. 


The inside remains the original wood color. And unless someone goes snooping in my bathroom, no one will ever know.   ; )

I also sprayed some keys (some new, some old) for another project I have in mind. Spray painting keys is the way to go... so much faster than painting them with a brush like I did for my framed keys project
More on the keys coming soon (I hope!). 

LinkWithin

Related Posts Plugin for WordPress, Blogger...